Community-specific guidelines
Tool information profiles and tutorials tailored to specific communities
Different communities - whether national, scientific or ones focused on a specific project - have different perspectives on the information they wish to disseminate about the tools and services within their portfolios.
Tool information profiles are a formal way to define which tool attributes - supported by the bio.tools registry - should be specified within a set of tool descriptions registered in bio.tools.
Accompanying the profiles are tutorials which tool developers and service providers can follow to improve the description of their resources in bio.tools. The aim is to improve the quality of the community tools portfolio, by improving the bio.tools entries, and by highlighting areas where the service around those tools can be improved.
Note
This page currently describes the profile and tutorial developed for IFB, but the expectation is that other communities will follow.
IFB tools
Caution
This tutorial describes some features of bio.tools which have not yet been released in the public version available at https://bio.tools. These features - and what to do - are indicated in an “Caution” box (like this one).
These instructions will guide you through the steps to register your tools and databases in bio.tools and describe them to the standard required for inclusion in the next iteration of the IFB Catalogue - the French national catalogue of bioinformatics resources.
There are various sources of information and help:
This document provides guidelines tailored to the IFB catalogue, highlighting key information and common pitfalls.
The bio.tools Curators Guide provides in-depth curation guidelines. You might need to refer to it, wherever you see the {learn more} links.
The biotoolsSchema documentation summarises the attributes, information model and controlled vocabularies - including the EDAM ontology - used by bio.tools. Links to these docs are provided where needed.
To get help using bio.tools, or for general curation advice, please mail registry-support.
Note
These instructions are tailored to the needs of IFB tool providers. If you find a bug, or have any questions or suggestions, please post them on GitHub.
1. Get a bio.tools account
You’ll need an account to create bio.tools entries or edit existing ones. Creating an account is simple: just go to bio.tools and click on  at the top-right corner of the page.
You’ll be asked for a username, email address and password. Your account will be setup immediately.
Note
bio.tools entries are owned by the individuals who created them. Owners may grant edit rights, or transfer ownership of their entries to other registered users. The rightful owner of a bio.tools entry is usually the person who developed the tool, or provides an online service, but it can be some other responsible person, e.g. a dedicated curator.
2. Claim your bio.tools entries
As a software developer or service provider, you should own the bio.tools entries describing your tools, by claiming ownership of existing entries or creating new ones.
You’ll need to login first, by clicking on  at the top-right corner of the page.
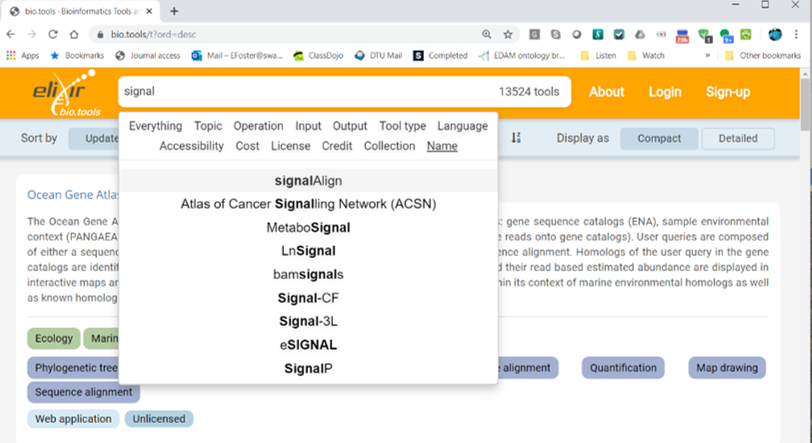
To see whether a tool is already registered, search for it by its name. Simply type the name in the search box. You may need to click on the Name facet to narrow-down the search:
Once you find your entry you can go ahead and update it. If you can’t find the entry, you’ll need to create it.
Important
All tools that were submitted for consideration in the ELIXIR FR Service Delivery Plan should already be registered, but may have only very basic details. You will need to take ownerhsip and improve the entries. Before starting work, please ensure you understand the information requirement and follow the guidelines below.
Updating entries
To edit an existing entry, you need to click through to the Tool Card for the tool in question, e.g. https://bio.tools/signalp. You’ll see a one or two buttons at the bottom right of the Tool Card, depending on whether you’re logged in, and own the entry or not.

Click on Request ownership if you want to claim ownership of the entry
Click on Request editing rights if you want to edit rights on the entry, but not own it
Click on Update this record to edit the entry (visible only if you own the entry or have editing rights)
Note
It can take a little while for other users to respond to requests for edit rights or ownership. If these are not granted within a day or two, please mail registry-support.
Creating entries
To create new entries you’ll need to be logged onto bio.tools. Click on Menu … Add content:

bio.tools editing interface
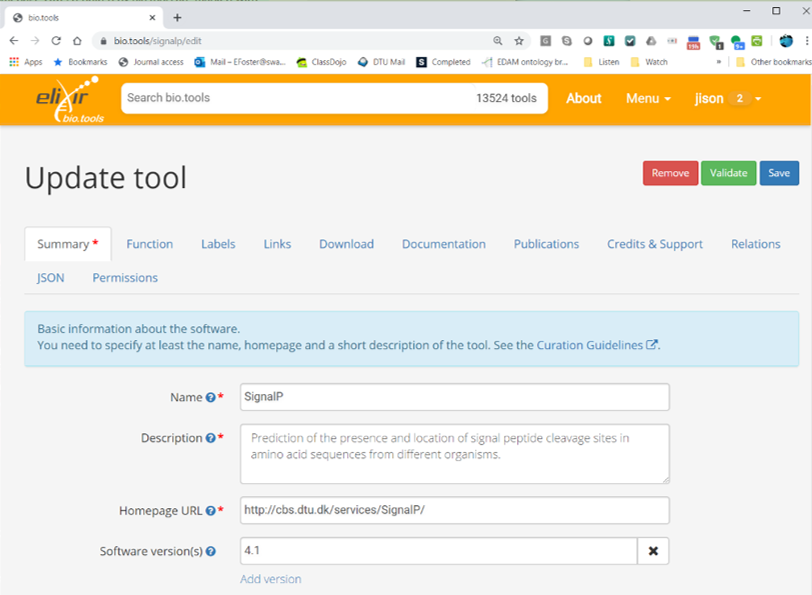
The bio.tools editing interface helps you to create valid tool descriptions. It’s organised into different tabs (Summary, Function, Labels etc.):
The editing interface provides some hints, and ensures that the information you set is in the right format. At any moment, you can click on  to save your edits, and immediately publish the changes online. The information you specified is checked to ensure it’s in the right syntax. To (optionally) force a manual syntax check, click on
  .
.
Important
The attributes required by bio.tools (tool name, description and homepage URL) are marked with a red asterix  in the editing interface, and must be given before an entry can be saved. Much more information is required for the IFB catalogue, but this is not enforced by bio.tools !
Note
It’s possibe to create tool descriptions in JSON format directly in a text editor, and either paste these into the editing interface (“JSON” tab) or use the bio.tools API. For guidance on using the API, see the API Reference and the API Usage Guide.
Removing entries
To remove an entry, click on Update this record button (bottom right of the Tool Card). Then you can remove the entry by clicking on  .
.
Warning
It shouldn’t normally be necessary to remove a bio.tools entry, and you should try to avoid needing to do so! Although deleted entries are actually just hidden, not really deleted, removing an entry is definitive. There’s no way back (other than emailing Registry Support).
3. Understand the information requirement
bio.tools
bio.tools requires only the name, description and homepage URL for a tool registration, but supports a comprehensive set of attributes for rich tool descriptions.
Note
The attributes supported by bio.tools, their structure and their syntax are defined in formalised XML schema called biotoolsSchema. You don’t need to look at the schema, because everything is handled through bio.tools. If you’d like to learn more or contribute to this project, please head over to GitHub.
The IFB catalogue
The information requirement of the IFB catalogue is more demanding than bio.tools, and depends upon the type of tool (command-line tool, database etc.) that is being registered. A given tool attribute is Mandatory, Recommended or Optional for a given type of tool:
Mandatory attributes MUST be specified.
Recommended attributes SHOULD be specified, but are not strictly required.
Optional attributes CAN be specified, to produce a rich tool description.
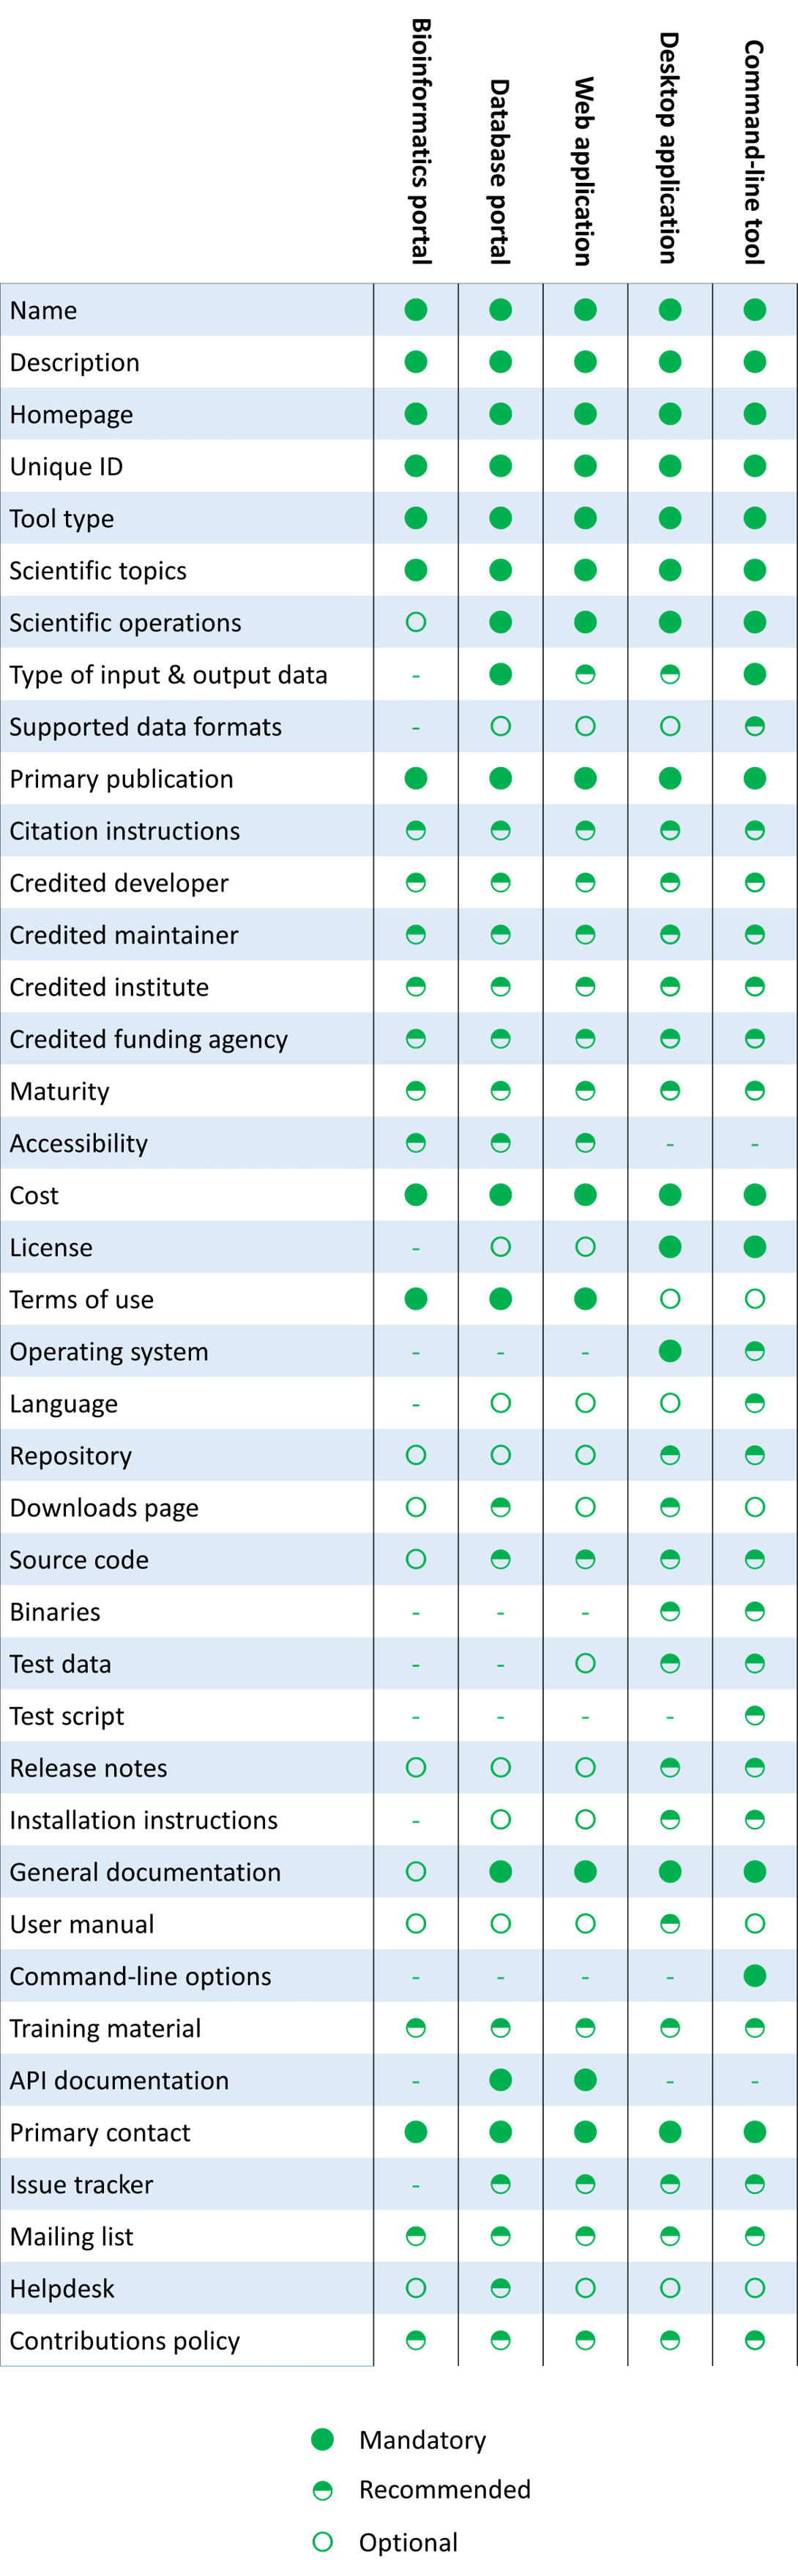
The above diagram is intended to give a quick overview of the information requirement. Only the main types of tool and most important attributes are shown. The guidelines below cover exactly what’s needed for each type of tool, and go through the curation process in a step-by-step way.
Important
All tools in the IFB catalogue must have at least a minimal description, i.e. all mandatory attributes are specified. Tool providers are encouraged to provide an enhanced description which also includes all of the recommended attributes.
4. Plan your curation work
bio.tools entries
Important
Before you use bio.tools to create and edit tool descriptions, it’s important to plan carefully the entries with respect to the types of tool and the functions they perform. Be sure to understand:
The type of tool being described - this determines the information requirement - and is covered in the section below on tool type.
The tool functionality and how it should be described - covered in the section on tool functions.
Whether one or more entries are needed (see below).
Plan what new entries (if any) are required to describe your tools:
A discrete tool - one which is clearly an individual, distinct entity - should have it’s own entry. This is the case for most command-line tools and desktop applications.
bio.tools aims to catalogue unique tool functionality. Different implementations but with esesentially the same functionality can be described by a single entry, e.g. a command-line tool that is later adapted into an R package for the Bioconductor suite, or which is served online via a Galaxy server.
In some cases, e.g. complex software packages, it’s not obvious whether to have one or multiple entries. Pick the option which mostly clearly illustrates the tool’s functionality to end-users.
Tool collections should be described by multiple entries. For example, one entry to describe a suite, and multple other entries to describe the individual tools within that suite.
Software with multiple interfaces should be described by a single entry, assuming these interfaces have essentially the same functionality. For example, a command-line tool whose functionality is also available via a web application, or a database portal with a web API.
Many database portals provide the typical database functions (browse, deposit, search, visualise, analyse and download), often in different interface components. Usually one entry will suffice, but sometimes multiple entries are better, especially where the portal provides multiple analytical functions under different interfaces.
For very complex entities such as Bioinformatics portals, do not try to describe everything in a single entry. Use a single entry for the portal, and multiple other entries for the things aggregated by the portal.
Familiarise yourself with EDAM
The EDAM ontology provides bio.tools with a controlled vocabulary to describe the scientific function of a tool, including the general scientific domain, specific operations it performs, types of input and output data, and supported data formats.


The EDAM ontology includes four main types of concept (or subontologies), shown in boxes above. The concepts are Topic, Operation, Data and Format, with Identifier being a specialisation of Data. Relationships between EDAM concepts are defined internally within the ontology. You don’t need to worry about these details, as it’s all handled by bio.tools.
Picking EDAM terms
Three EDAM browsers, each with different functionality, can be used to find EDAM terms:
Tip
The EDAM term picker currently implemented in bio.tools is not very powerful. It’s strongly recommended to use the browsers above. If you can’t find exactly the terms you need, multiple searches using synonyms, alternative spellings etc. can help.
A much better term picker is on the way, and while not yet fully integrated into bio.tools is already very useful:
You can use this to pick relevant topics and define the function of your tools. The ouput (in the bottom pane of the window) is a JSON object that can be copy-pasted into the JSON tab of the bio.tools editing interface, when editing a tool description.
If you can’t find the right term, please request that it’s added to EDAM via GitHub but first read the guidelines on how to request a term.
5. Describe your tools
The sections below match the tabs in the bio.tools editing interface.
Note
Only those tool attributes that are Mandatory or Recommended are described below, but you can of course also specify the Optional ones.
The {learn more} links take you to more detailed guidelines in the bio.tools Curators Guide. Follow these links whenever you’re not sure about what information is needed.
Summary
In the Summary tab you specify basic information about the software:
Attribute |
Requirement |
|---|---|
Name |
Mandatory |
Description |
Mandatory |
Homepage URL |
Mandatory |
Name is the short-form name by which the tool is commonly known, e.g. “BLAST” not “Basic Local Alignment Search Tool”. Database names should follow a pattern where the name and abbreviation are given e.g. “The Protein Databank (PDB)” {learn more}.
Description is a concise textual summary of the tool function or purpose. It can usually be copy-pasted from the tool homepage. Do not include statements about performance, provenance, governance etc. {learn more}.
Homepage URL is the tool’s homepage, or some URL that best serves this purpose {learn more}.
Important
A unique identifier - the bio.tools toolID - is created for a tool when a new entry is created. The ID value is a URL-safe version of the supplied tool name. The ID provides a persistent reference to the tool, used by bio.tools and other systems. toolIDs are used in the Tool Card URLs, which can be represented in a short form as a “compact URI” or “CURIE”:
toolID: signalp
CURIE: biotools:signalp
Tool Card URL: https://biotools/signalp
The ID should be sensible and intuitive. For databases, or tools with long names, the abbreviation should be used. For example, the GnpIS tool tool has the ID “gnpis” and not “Genetic and Genomic Information System”.
Tip
The toolID is not currently editable, so if you want the ID to differ from the name (e.g. an ID of “PDB” for the tool name “Protein databank (PDB)”, you have to apply a workaround:
create the entry giving a value for “Name” which is the desired ID value, e.g. “PDB”
Save the entry
Edit the entry, resetting the name, e.g. to “Protein Databank (PDB)”
To request an ID change post-registration (to be avoided!) you have to mail Registry Support.
Labels
In the Labels tab you specify miscellaneous scientific, technical and administrative details, expressed in terms from controlled vocabularies:
ATTRIBUTE |
REQUIREMENT |
|---|---|
Tool type |
Mandatory |
Topic |
Mandatory |
Cost |
Mandatory |
License |
Mandatory (Desktop application, Command-line tool) |
Operating system |
Mandatory (Desktop application) |
Recommended (Command-line tool) |
|
Maturity |
Recommended |
Accessibility |
Recommended (Bioinformatics portal, Database portal, Web application) |
Language |
Recommended (Command-line tool) |
Tool type describes the type of the tool: a bio.tools entry can have more than one type. See below {learn more}.
Topic is the general scientific domain the tool serves, or other general category (an EDAM term). See below {learn more}.
Cost is the monetary cost of acquiring the software {learn more}.
License is a software or data usage license. See below {learn more}.
Operating system is the operating system supported by a downloadable software package - pick all that apply {learn more}.
Maturity is how mature the software product is; Emerging, Mature or Legacy. Don’t pick Mature for tools which aren’t really mature yet! {learn more}.
Accessibility is whether there are non-monetary restrictions on accessing an online service; Open access, Open access (with restrictions) or Restricted access. Read the definitions before picking these terms! {learn more}.
Language is the name of a programming language the tool source code was written in {learn more}.
Tip
You can use Collection to assign tools which are somehow related to one or more groups. These collections can have any names you like. Other ways to group tools are by creating a bio.tools subdomain (from Menu…Manage subdomains) and by defining relations between tools.
Note
ELIXIRNode and ELIXIRPlatform define the name of an ELIXIR node or ELIXIR platform, respectively, that is credited for the tool. All tools in the IFB catalogue will have the ELIXIRNode credit set to “France”. These are not normally be set by bio.tools users {learn more}. ELXIRCommunity defines a community (ELIXIR or otherwise) to which the resource is directly relevant - you can select as many as you wish.
Tool type
The scope of bio.tools is very broad - ranging from simple scripts to comprehensive bioinformatics portals - as defined by 15 different tool types. The vast majority of entries are of the following types:
TYPE |
DESCRIPTION |
|---|---|
Bioinformatics portal |
A web site providing a platform/portal to multiple resources used for research in a focused area, including biological databases, web applications, training resources and so on. |
Database portal |
A Web site providing a portal to a biological database, typically allowing a user to browse, deposit, search, visualise, analyse or download data. |
Web application |
A tool with a graphical user interface that runs in your Web browser. |
Desktop application |
A tool with a graphical user interface that runs on your desktop environment, e.g. on a PC or mobile device. |
Command-line tool |
A tool with a text-based (command-line) interface. |
Other common types incude:
TYPE |
DESCRIPTION |
|---|---|
Web API |
An application programming interface (API) consisting of endpoints to a request-response message system accessible via HTTP. Includes everything from simple data-access URLs to RESTful APIs. |
Workflow |
A set of tools which have been composed together into a pipeline of some sort. Such tools are (typically) standalone, but are composed for convenience, for instance for batch execution via some workflow engine or script. |
Suite |
A collection of tools which are bundled together into a convenient toolkit. Such tools typically share related functionality, a common user interface and can exchange data conveniently. This includes collections of stand-alone command-line tools, or Web applications within a common portal. |
Workbench |
An application or suite with a graphical user interface, providing an integrated environment for data analysis which includes or may be extended with any number of functions or tools. Includes workflow systems, platforms, frameworks etc. |
Workflow |
A set of tools which have been composed together into a pipeline of some sort. Such tools are (typically) standalone, but are composed for convenience, for instance for batch execution via some workflow engine or script. |
Library |
A collection of components that are used to construct other tools. bio.tools scope includes component libraries performing high-level bioinformatics functions but excludes lower-level programming libraries. |
A single bio.tools entry is annotated with one or more types, reflecting different facets of the tool described by the entry. Be sure to understand the type(s) of tool you have, because it determines the information that’s expected. A few suggestions:
Bioinformatics portals aggregate information about tools and databases, but don’t (typically) directly serve them. Only use Bioinformatics portal for sites that cover multiple other resources, each which are their own distinct entity (and should have their own bio.tools entries). Good examples include IMGT and wheatIS.
Suite might be more applicable than Bioinformatics portal. Example include Web application suites such as CRISRP-Cas++ and EvryRNA, and suites of command-line tools such as BioConductor.
Workbench might be also be more applicable than Bioinformatics portal. This includes online and desktop integrated environements. Example include the general-purpose Galaxy workbench and domain-specific ones such as MetExplore and MicroScope.
Typically use only one of Bioinformatics portal, Database portal or Web application in a single entry. If the resource is providing a database, then just go with Database portal, a good example being Norine.
In general, often a singe tool type will do. For example, LoRDEC (a Command-line tool), GINsim (a Desktop application), and Ocean Gene Atlas or Genomicus (both are Web application).
But do pick all the types that apply. For example the BOOSTER Command-line tool is also available as a Web application (and if these implementations have essentially the same functionality, they’d be described in a single bio.tools entry).
If a database has an API (most do!) then use both Database portal and Web API, for example aNISEED.
Use the more specialised tool types where they are applicable, for example Workflow for Workflow4Metabolomics and Library for any R pacages.
Tip
Software is complex and it can be tricky to assign a type. Make sure you understand the tool type definitions before you use them. For example, in bio.tools a Web service is specifically a SOAP+WSDL implementation. Most likely you need Web API (which covers most APIs nowadays) or just Web application (for a tool delivered via the Web but without an API).
License
All downloadable software should be licensed. If you can’t find your license in the list, use one of the terms below:
Note
There are many good reasons why you should license your software, ideally picking a FOSS (Free and Open Source Software) license. Read A Quick Guide to Software Licensing for the Scientist-Programmer. Some types of tools e.g. *Web application” are not licensed, but instead, should have a Terms of use document. Proprietary licenses are definitely not open-source or, and should be avoided!
If your sofware is available under a license not supported by bio.tools, then please request the license is added. If you find yourself picking Not licensed - this is bad - license your software!
Topic
Topic is the place to tag your tool with EDAM terms describing the scientific domain the tool serves, or other general category.
specify the most important and relevant scientific topic; up to 3 topics will usually suffice
don’t exhaustively specify all the topics of lower or secondary relevance
Tip
Don’t rely on the term picker included in bio.tools to find topics and other EDAM terms - use the EDAM browsers or EDAM Tool Annotator instead. They are much more powerful!
Function
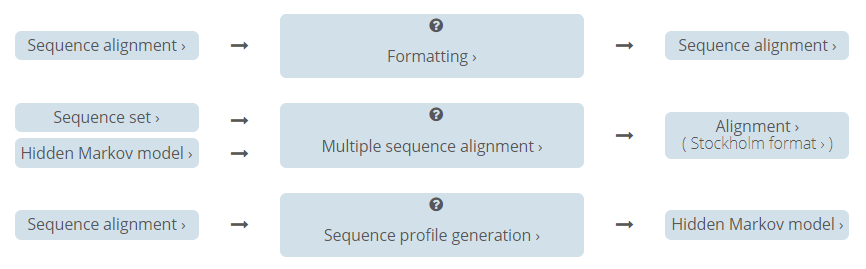
In the bio.tools software model, a tool has one or more basic functions, or modes of operation. Each function performs at least one operation, and has one or more primary inputs and outputs. Each input and output are of single defined type of data and list one or more supported format(s).
This is shown in a diagram on the Tool Cards that look like this:

For example, the tool signalp has a single function performing two operations, with a single input and two outputs:

Whereas the tool HMMER3 has multiple functions (only 3 shown here):
Note
The HMMER3 entry has very nicely annotated functionality, but is a good example of where the entry would be easier to understand if the functionality was described in separate entries - retaining the existing entry for the suite, but creating a new entry for each of the HMMER programs (alimask, hmmalign, hmmbuid etc.).
In the Function tab you specify the functions of the tool, expressed in concepts from the EDAM ontology.
ATTRIBUTE |
REQUIREMENT |
|---|---|
Operation |
Mandatory (Database portal, Web application, Desktop application, Command-line tool) |
Input->data |
Mandatory (Command-line tool) |
Recommended (Web application, Desktop application) |
|
Input->format |
Recommended (Command-line tool) |
Output->data |
Mandatory (Database portal, Command-line tool) |
Recommended (Web application, Desktop application) |
|
Output->format |
Recommended (Command-line tool) |
Operation describes the basic operation(s) performed by this software function. See below {learn more}.
Data is a type of primary input or output data. See below {learn more}.
Format is the allowed format(s) of the input or output data. See below {learn more}.
Note
You can use Note to add a concise comment about this function, if this is not apparent from the software description and EDAM annotations.
Tip
When deciding how to describe your tools, in terms of bio.tools entries, their functions and operations, always keep the end-user in mind and try to describe your tools in a way that will be clear to them.
It can be difficult to find the right terms to describe a tools operation(s), input(s) or output(s). It’s highly recommended to use EDAM Tool Annotator to describe the function, and carefully copy-paste the JSON ouput (in the bottom pane of the window) into the JSON tab of the bio.tools editing interface. Or use the OLS, BioPortal or EDAM Browser alongside bio.tools when describing your tools. If you’re not sure, mail registry-support for help.
Operation
Before describing your tools, you should carefully identify the distinct functions and the individual operations associated with each one. This is often straighforward, as different functions (modes) typically perform distinct operations:
if a tool has an option between doing one thing or another, then you should annotate the operations as distinct functions
if in contrast a tool always does one or more things, then you should annotate these as distinct operations within a single function
only specify the primary functions and operations, from a typical end-user perspective - tools often do many other things than its central, advertised purpose - you don’t need to describe everything!
Tip
Database portal usually provide one ore more of a common set of operations:
Browse - no term in EDAM yet
Deposit - Deposition (http://edamontology.org/operation_3431)
Search - Database search (http://edamontology.org/operation_2421)
Visualise - Visualisation (http://edamontology.org/operation_0337)
Analyse - Analysis (http://edamontology.org/operation_2945)
Download - Data retrieval (http://edamontology.org/operation_2422)
When annotating the operations, you should specify all of these that apply. Consider carefully whether the Analyis operation(s) would be better listed as functions of discrete tools described in their own own entries (see bio.tools entries).
Data
data terms must be correctly associated with the operation(s)
only specify the primary inputs and outputs, e.g. a sequence alignment tool would be annotated as reading sequences (input), and writing a sequence alignment (output), but not with gap insertion and extension penalties, or other parameters.
Tip
For Database portal:
for Deposition and Data retrieval operations, you can associate the types of data available for upload (input) or download (output).
for Search operation, you can specify Database search results (http://edamontology.org/data_2080) as an output, or some other more specific term in the EDAM Data subontology.
Format
format terms must be correctly associated with an input or output data type
specify the most widely used of the supported data formats - it can be impractical / onerous to be exhaustive!
Links
In the Links tab you specify miscellaneous links for the tool. The type of information obtained when resolving the link is specified by Link type:
ATTRIBUTE |
REQUIREMENT |
|---|---|
Repository |
Recommended (Desktop application, Command-line tool) |
Mailing list |
Recommended |
Issue tracker |
Recommended (Database portal, Web application, Desktop application, Command-line tool) |
Helpdesk |
Recommended (Database portal) |
Repository is where source code, data and other files may be downloaded, e.g. a GitHub repo, or an FTP site.
Mailing list is for software announcements, discussions, support etc.
Issue tracker is for software issues, bug reports, feature requests etc.
Helpdesk is a phone line, web site or email-based system providing help to the end-user of the software.
Tip
A single link might resolve to a page containing information of more than one type; in these cases pick all of the types that apply!
Note
It’s strongly recommended to put your source code and other downloadable resources in a public repository such as GitHub. It takes little effort to do so. A repo can serve as a homepage for your tool, and provide an issue tracker and open forum for discussion. If you don’t have a repo, you should at least provide a downloads page.
Caution
Currently, to assign a link to more than one type you have to enter the URL more than once, picking a different type each type. In future, you’ll be able to enter the URL once and pick multiple types.
Download
In the Download tab you specify links to downloads for your software.
TYPE |
REQUIREMENT |
|---|---|
Source code |
Recommended (Database portal, Web application, Desktop application, Command-line tool) |
Binaries |
Recommended (Desktop application, Command-line tool) |
Software package |
Recommended (Desktop application, Command-line tool) |
Downloads page |
Recommended (Database portal, Desktop application) |
API specification |
Recommended (Database portal - with API) |
Test data |
Recommended (Desktop application, Command-line tool) |
Test script |
Recommended (Command-line tool) |
Source code should trigger a download of the latest source code available (typically the latest stable version)
Binaries should trigger a download of the latest binaries available
Software package should trigger a download of the latest software package.
Downloads page is a Web page summarising general downloads available for the software.
API specification is a file providing a machine-readable API specification for the software, e.g. Swagger/OpenAPI, WSDL or RAML file. It’s not for human-readable API documentation (see documentation for that).
Test data is data for testing the software is working correctly.
Test script is a script used for testing testing whether the software is working correctly.
Tip
With the exception of Downloads page, the expectation is that a link annotated in the Download section will trigger a download of a file. If you’re adding a link which doesn’t have this behaviour, you should see whether an attribute in the Links section is more appropriate.
Note
Command-line specification and API specification are files providing a machine-readable specification of the command line or API, for the software. These are not used for the typical human-readable documentation (see Documentation for that).
Documentation
In the Documentation tab you link to documentation about the software:
TYPE |
REQUIREMENT |
|---|---|
General |
Mandatory (Database portal, Web application, Desktop application, Command-line tool) |
API documentation |
Mandatory (Database portal or Web application - with API) |
Terms of use |
Mandatory (Bioinformatics portal, Database portal, Web application) |
Command-line options |
Mandatory (Command-line tool) |
Citation instructions |
Recommended |
Contributions policy |
Recommended |
Training material |
Recommended |
Installation instructions |
Recommended (Desktop application, Command-line tool) |
User manual |
Recommended (Desktop application) |
Release notes |
Recommended (Desktop application, Command-line tool) |
General is for general documentation. If your tool doesn’t have a dedicated documentation page, but is documented elsewhere (e.g. on the homepage or a GitHub README.md) then specify that URL instead.
API documentation is human-readable API documentation, and should be specified for any Database portal or Web application with an API.
Terms of use are rules that one must agree to abide by in order to use a service. Note, this is different to License!
Command-line options are human-readable documentation about the command-line interface of a tool.
Citation instructions give information on how to correctly cite use of the software; typically which publication(s) to cite, or something more general, e.g. a form of words to use. This is especially important where there are multiple relevant publications.
Contributions policy is information about policy for making contributions to the software project.
Training material is an online training material such as a tutorial, a presentation, video etc.
Installation instructions are instructions how to install the software.
User manual is information on how to use the software, structured into a comprehensive user manual (don’t just link here to general documentation).
Release notes are notes about a software release or changes to the software (a change log). For example a CHANGELOG.md file on GitHub.
Note
You should create contribution guidelines to communicate how people should contribute to your open source project. In GitHub this is done by createing a CONTRIBUTING.MD file. Lots of good advice, templates and examples are available (e.g. Atom editor, Ruby on Rails and Open Government).
A well maintained change log wlll make it easier for users and contributors to see precisely what notable changes have been made between each release (or version) of the project. For some great advice, see keepachangelog.com.
Note
Command-line tools should always have a human-readable description of their command-line options. Similarly, an API on a Database portal or Web application should have a human-readable description of their API. If machine-readable command-line or API specifications (files) are also available, then you should link to those in the Download section.
Important
You must not specify a link to a general page where a more specific one is available. For example, don’t link to the homepage in the General field if, in fact, there’s a dedicated page for documentation. If you want to link to some documentation not of a type supported by biotoolsSchema, then use the Other value.
Caution
Currently, to assign a documentation to more than one type you have to enter the URL more than once, picking a different type each type. In future, you’ll be able to enter the URL once and pick multiple types.
Publications
In the Publications tab you specify publications about the software:
ATTRIBUTE |
REQUIREMENT |
|---|---|
Primary publication |
Mandatory |
Publications are defined as one of the following types:
TYPE |
DESCRIPTION |
|---|---|
Primary |
The principal publication about the tool itself; the article to cite when acknowledging use of the tool. |
Method |
A publication describing a scientific method or algorithm implemented by the tool. |
Usage |
A publication describing the application of the tool to scientific research, a particular task or dataset. |
Benchmarking study |
A publication which assessed the performance of the tool. |
Review |
A publication where the tool was reviewed. |
Preprint |
A publication of relevance to the tool that has not yet been peer-reviewed. |
Other |
A publication of relevance to the tool but not fitting the other categories. |
and can have the following attributes defined:
Attribute |
Description |
|---|---|
pmcid |
PubMed Central Identifier of a publication about the software. |
pmid |
PubMed Identifier. |
doi |
Digital Object Identifier. |
note |
Comment about the publication. |
version |
Version information (typically a version number) of the software applicable to this publication. |
Specify at least the primary publication for your tool, and ideally any others that are relevant.
Pick one or more types for each publication, as applicable.
Tip
You should specify DOI for publications (if available) and do not have to also specify pmid and pmcid. But if you do, then be sure to specify multiple IDs for a single publication within a single publication group.
You can ignore note and version.
Note
It’s very important that your tool has some form of publication, if for no other reason than to make it citable. If you don’t have a publication in the scientific press, then you can use Zenodo to create a DOI for this purpose. Such a DOI should resolve to a page describing the tool. For example http://doi.org/10.5281/zenodo.3519603.
Caution
Currently, to assign a publicaton to more than one type you have to enter the DOI more than once, picking a different type each type. In future, you’ll be able to enter the DOI once and pick multiple types.
Credits & Support
In the Credits & Support tab you specify individuals or organisations that should be credited, or may be contacted about the software. Credits include all type of entities that contributed to the development, maintenance or provision of the resource:
ATTRIBUTE |
REQUIREMENT |
|---|---|
Primary contact |
Mandatory |
Credited institute |
Recommended |
Credited funding agency |
Recommended |
Credited developer |
Recommended |
Credited maintainer |
Recommended |
Creditable entities have one of the following types:
TYPE |
DESCRIPTION |
|---|---|
Person |
Credit of an individual. |
Project |
Credit of a community software project not formally associated with any single institute. |
Division |
Credit of or a formal part of an institutional organisation, e.g. a department, research group, team, etc |
Institute |
Credit of an organisation such as a university, hospital, research institute, service center, unit etc. |
Consortium |
Credit of an association of two or more institutes or other legal entities which have joined forces for some common purpose. Includes Research Infrastructures (RIs) such as ELIXIR, parts of an RI such as an ELIXIR node etc. |
Funding agency |
Credit of a legal entity providing funding for development of the software or provision of an online service. |
and also have a role:
ROLE |
DESCRIPTION |
|---|---|
Developer |
Author of the original software source code. |
Maintainer |
Maintainer of a mature software providing packaging, patching, distribution etc. |
Provider |
Institutional provider of an online service. |
Documentor |
Author of software documentation including making edits to a bio.tools entry. |
Contributor |
Some other role in software production or service delivery including design, deployment, system administration, evaluation, testing, documentation, training, user support etc. |
Support |
Provider of support in using the software. |
Primary contact |
The primary point of contact for the software. |
You must specify at least:
A credit of role Primary contact with an applicable type. You can opt to give more than one primary contact, for example specifing one for a project and another for a person.
It’s recommended to specify:
A credit of type Institute with one ore more applicable roles
A credit of type Funding agency
A credit of role Developer with one ore more applicable types
A credit of role Maintainer with one ore more applicable types
For any credit, you can specify any of the following:
Attribute |
Description |
|---|---|
name |
Name of the entity that is credited. |
orcidid |
Unique identifier (ORCID iD) of a person that is credited. |
gridid |
Unique identifier (GRID ID) of an organisation that is credited. |
rorid |
Unique identifier (ROR ID) of an organisation that is credited. |
fundrefid |
Unique identifier (FundRef ID or Funder ID) of a funding organisation that is credited. |
Email address. |
|
url |
URL, e.g. homepage of an institute. |
tel |
Telephone number. |
typeEntity |
Type of entity that is credited (see above) |
typeRole |
Role performed by entity that is credited (see above) |
note |
A comment about the credit. |
Important
A credit can have multipe role. When creating a credit, pick all of the roles that apply; don’t create duplicate credit groupings!
Note
It’s strongly recommended that if you (or other people to be credited) don’t have an ORCID iD, that you get one now. ORCID provides a persistent digital identifier that distinguishes you from every other researcher and, through integration in key research workflows such as manuscript and grant submission, supports automated linkages between you and your professional activities ensuring that your work is recognized.
Note
Nearly all organisations credited in bio.tools will have a GRID ID. The Global Research Identifier Database (GRID) provides unambiguous institutional information at persistent IDs, to ensure data consistency.
Relations
In the Relations tab you can specify details of a relationship this software shares with other software registered in bio.tools.
The relationships currently available:
Relation |
Description |
|---|---|
isNewVersionOf |
The software is a new version of an existing software, typically providing new or improved functionality. |
hasNewVersion |
(inverse of above) |
uses |
The software provides an interface to or in some other way uses the functions of other software under the hood, e.g. invoking a command-line tool or calling a Web API, Web service or SPARQL endpoint to perform its function. |
usedBy |
(inverse of above) |
includes |
A workbench, toolkit or workflow includes some other, independently available, software. |
includedIn |
(inverse of above) |
You can ignore this for now, except:
when annotating a Suite (or other collection) it’s recommended to specify other tools that the suite includes
when annotating a Workflow it’s recommended to specify other tools that the workflow uses
JSON
In the JSON tab you see all the information that you’ve specified for a tool so far. You can work directly in this pane if you wish. This can be very useful when using the EDAM Tool Annotator to define the tool’s function (see the section on EDAM.)
Permissions
In the Permissions tab you can decide to make the entry either editable only by yourself, a list of users or anyone. See the section on bio.tools accounts.
Workflow composition (Lorentz workshop)
These instructions provide a quick guide to the steps to register your tools in bio.tools and describe them using the EDAM ontology to a standard suitable for applications in workflow composition. They were written to support the workshop Automated Workflow Composition in the Life Sciences hosted by the Lorentz Center.
Help is available:
To get help using bio.tools, or for general curation advice, please mail registry-support.
To get help using the EDAM ontology, please head over to <GitHub `https://github.com/edamontology/edamontology>`_ and post an issue.
If you have questions specifically about curation of tools for the Lorent workshop, you can mail Jon Ison directly.
Note
For more information and help, see:
Guidelines for IFB tools cover similar ground to this document, but in more detail.
The bio.tools Curators Guide provides in-depth curation guidelines.
The biotoolsSchema documentation summarises the attributes, information model and controlled vocabularies - including the EDAM ontology - used by bio.tools.
The EDAM ontology documentation everything you need to know about contributing to, editing and developing EDAM.
If you find a bug in this document, or have any questions or suggestions, please post them on GitHub.
1. Get a bio.tools account
You’ll need an account to create bio.tools entries or edit existing ones. Creating an account is simple: just go to bio.tools and click on at the top-right corner of the page.
You’ll be asked for a username, email address and password. Your account will be setup immediately.
Note
bio.tools entries are owned by the individuals who created them. Owners may grant edit rights, or transfer ownership of their entries to other registered users - these rights are set in the Permissions tab of the bio.tools editing interface.
The rightful owner of a bio.tools entry is usually the person who developed the tool, or provides an online service, but it can be some other responsible person, e.g. a dedicated curator.
2. Claim your bio.tools entries
As a software developer or service provider, you should own the bio.tools entries describing your tools, by claiming ownership of existing entries or creating new ones. Alternatively, if you just want to edit a tool description, than you can request edit rights for it.
You’ll need to login first, by clicking on at the top-right corner of the page.
To see whether a tool is already registered, search for it by its name. Simply type the name in the search box. You may need to click on the Name facet to narrow-down the search:
Once you find your entry you can go ahead and update it. If you can’t find the entry, you’ll need to create it.
Important
Many of the tools you need already have been registered, but possibly with only very basic details. You will need to take ownerhsip or request edit rights on these entries to improve them. Before starting work, please ensure you understand the information requirement and follow the guidelines below.
Updating entries
To edit an existing entry, you need to click through to the Tool Card for the tool in question, e.g. https://bio.tools/signalp. You’ll see a one or two buttons at the bottom right of the Tool Card, depending on whether you’re logged in, and own the entry or not.
Click on Request ownership if you want to claim ownership of the entry
Click on Request editing rights if you want to edit rights on the entry, but not own it
Click on Update this record to edit the entry (visible only if you own the entry or have editing rights)
Note
It can take a little while for other users to respond to requests for edit rights or ownership. If these are not granted within a day or two, please mail registry-support.
Creating entries
To create new entries you’ll need to be logged onto bio.tools. Click on Menu … Add content:
bio.tools editing interface
The bio.tools editing interface helps you to create valid tool descriptions. It’s organised into different tabs (Summary, Function, Labels etc.):
The editing interface provides some hints, and ensures that the information you set is in the right format. At any moment, you can click on to save your edits, and immediately publish the changes online. The information you specified is checked to ensure it’s in the right syntax. To (optionally) force a manual syntax check, click on .
Important
The attributes required by bio.tools (tool name, description and homepage URL) are marked with a red asterix in the editing interface, and must be given before an entry can be saved. You will need to provide more information to support workflow composition - especially about the tool function - but this is not enforced by bio.tools !
Note
It’s possibe to create tool descriptions in JSON format directly in a text editor and paste these into the editing interface (“JSON” tab), where you see all the information that you’ve specified for a tool so far. You can work directly in this pane if you wish. This can be very useful when using the EDAM Tool Annotator to define the tool’s function (see the section on EDAM.)
Removing entries
To remove an entry, click on Update this record button (bottom right of the Tool Card). Then you can remove the entry by clicking on .
Warning
It shouldn’t normally be necessary to remove a bio.tools entry, and you should try to avoid needing to do so! Although deleted entries are actually just hidden, not really deleted, removing an entry is definitive. There’s no way back (other than emailing Registry Support).
3. Plan your curation work
Information requirement
bio.tools requires only the name, description and homepage URL for a tool registration, but supports a comprehensive set of attributes for rich tool descriptions.
To support workflow composition, very careful curation of tool functionality - it’s input(s), operation(s) and output(s) - is required. The guidelines below cover exactly what’s needed, and go through the curation process in a step-by-step way.
Note
The attributes supported by bio.tools, their structure and their syntax are defined in formalised XML schema called biotoolsSchema. You don’t need to look at the schema, because everything is handled through bio.tools. If you’d like to learn more or contribute to this project, please head over to GitHub.
Before you start
Important
Before you use bio.tools to create and edit tool descriptions, be sure to understand:
The type of tool being described - covered below in the section below on Basic information.
The tool functionality and how it should be described - covered in the section on tool functions.
Whether one or more entries are needed (see below).
Plan what new entries (if any) are required to describe your tools:
A discrete tool - one which is clearly an individual, distinct entity - should have it’s own entry. This is the case for most command-line tools and desktop applications.
bio.tools aims to catalogue unique tool functionality. Different implementations but with esesentially the same functionality can be described by a single entry, e.g. a command-line tool that is later adapted into an R package for the Bioconductor suite, or which is served online via a Galaxy server.
In some cases, e.g. complex software packages, it’s not obvious whether to have one or multiple entries. Pick the option which mostly clearly illustrates the tool’s functionality to end-users.
Tool collections should be described by multiple entries. For example, one entry to describe a suite, and multple other entries to describe the individual tools within that suite.
Software with multiple interfaces should be described by a single entry, assuming these interfaces have essentially the same functionality. For example, a command-line tool whose functionality is also available via a web application, or a database portal with a web API.
For more information, see the IFB tools tutorial.
Familiarise yourself with EDAM
The EDAM ontology provides bio.tools with a controlled vocabulary to describe the scientific function of a tool, including the general scientific domain, specific operations it performs, types of input and output data, and supported data formats.
The EDAM ontology includes four main types of concept (or subontologies), shown in boxes above. The concepts are Topic, Operation, Data and Format, with Identifier being a specialisation of Data. Relationships between EDAM concepts are defined internally within the ontology. You don’t need to worry about these details, as it’s all handled by bio.tools.
Picking EDAM terms
Three EDAM browsers, each with different functionality, can be used to find EDAM terms:
Tip
The EDAM term picker currently implemented in bio.tools is not very powerful. It’s strongly recommended to use the browsers above. If you can’t find exactly the terms you need, multiple searches using synonyms, alternative spellings etc. can help.
A much better term picker is on the way, and while not yet fully integrated into bio.tools is already very useful:
You can use this to pick relevant topics and define the function of your tools. The ouput (in the bottom pane of the window) is a JSON object that can be copy-pasted into the JSON tab of the bio.tools editing interface, when editing a tool description.
If you can’t find the right term, please request that it’s added to EDAM via GitHub but first read the guidelines on how to request a term. It takes some time for new terms to be supported in bio.tools, so if you need many new terms, please plan ahead and contact the EDAM developers if you need help.
4. Describe your tools
Note
Only those tool attributes that are Mandatory in bio.tools, or which are required to support workflow composition are described below, but you can of course specify much mre. The {learn more} links take you to more detailed guidelines in IFB tools or the bio.tools Curators Guide. Follow these links whenever you’re not sure about what information is needed.
Basic information
In the Summary tab you specify basic information about the software:
Name is the short-form name by which the tool is commonly known, e.g. “BLAST” not “Basic Local Alignment Search Tool”. Database names should follow a pattern where the name and abbreviation are given e.g. “The Protein Databank (PDB)” {learn more}.
Description is a concise textual summary of the tool function or purpose. It can usually be copy-pasted from the tool homepage. Do not include statements about performance, provenance, governance etc. {learn more}.
Homepage URL is the tool’s homepage, or some URL that best serves this purpose {learn more}.
Important
A unique identifier - the bio.tools toolID - is created for a tool when a new entry is created. The ID value is a URL-safe version of the supplied tool name. The ID provides a persistent reference to the tool, used by bio.tools and other systems. toolIDs are used in the Tool Card URLs, which can be represented in a short form as a “compact URI” or “CURIE”:
toolID: signalp
CURIE: biotools:signalp
Tool Card URL: https://biotools/signalp
The ID should be sensible and intuitive. For databases, or tools with long names, the abbreviation should be used. For example, the GnpIS tool tool has the ID “gnpis” and not “Genetic and Genomic Information System”.
Tip
The toolID is not currently editable, so if you want the ID to differ from the name (e.g. an ID of “PDB” for the tool name “Protein databank (PDB)”, you have to apply a workaround:
create the entry giving a value for “Name” which is the desired ID value, e.g. “PDB”
Save the entry
Edit the entry, resetting the name, e.g. to “Protein Databank (PDB)”
To request an ID change post-registration (to be avoided!) you have to mail Registry Support.
In the Labels tab you specify miscellaneous scientific, technical and administrative details, expressed in terms from controlled vocabularies. For now, annotate the following:
Tool type is where you specify the type(s) of software that is described by the entry. A single bio.tools entry may be annotated with one or more types, reflecting different facets of the tool described by the entry. {learn more}.
Topic is the place to tag your tool with EDAM terms describing the scientific domain the tool serves, or other general category.
specify the most important and relevant scientific topic; up to 3 topics will usually suffice
don’t exhaustively specify all the topics of lower or secondary relevance
Note
The scope of bio.tools is very broad - ranging from simple scripts to comprehensive bioinformatics portals - as defined by 15 different tool types. The vast majority of tools used to compose workflows are of the following types:
TYPE |
DESCRIPTION |
|---|---|
Command-line tool |
A tool with a text-based (command-line) interface. |
Web application |
A tool with a graphical user interface that runs in your Web browser. |
Desktop application |
A tool with a graphical user interface that runs on your desktop environment, e.g. on a PC or mobile device. |
Web API |
An application programming interface (API) consisting of endpoints to a request-response message system accessible via HTTP. Includes everything from simple data-access URLs to RESTful APIs. |
Tip
Don’t rely on the term picker included in bio.tools to find topics and other EDAM terms - use the EDAM browsers or EDAM Tool Annotator instead. They are much more powerful!
Function
In the bio.tools software model (biotoolsSchema), a tool has one or more basic functions, or modes of operation. Each function performs at least one operation, and has one or more primary inputs and outputs. Each input and output are of single defined type of data and list one or more supported format(s).
This is shown in a diagram on the Tool Cards that look like this:
For example, the tool signalp has a single function performing two operations, with a single input and two outputs:
Whereas the tool HMMER3 has multiple functions (only 3 shown here):
Note
The HMMER3 entry has very nicely annotated functionality, but is a good example of where the entry would be easier to understand if the functionality was described in separate entries - retaining the existing entry for the suite, but creating a new entry for each of the HMMER programs (alimask, hmmalign, hmmbuid etc.).
In the Function tab you specify the functions of the tool, expressed in concepts from the EDAM ontology.
Operation describes the basic operation(s) performed by this software function. See below {learn more}.
Data is a type of primary input or output data. See below {learn more}.
Format is the allowed format(s) of the input or output data. See below {learn more}.
Note
You can use Note to add a concise comment about this function, if this is not apparent from the software description and EDAM annotations.
Tip
When deciding how to describe your tools, in terms of bio.tools entries, their functions and operations, always keep the end-user in mind and try to describe your tools in a way that will be clear to them.
It can be difficult to find the right terms to describe a tools operation(s), input(s) or output(s). It’s highly recommended to use EDAM Tool Annotator to describe the function, and carefully copy-paste the JSON ouput (in the bottom pane of the window) into the JSON tab of the bio.tools editing interface. Or use the OLS, BioPortal or EDAM Browser alongside bio.tools when describing your tools. If you’re not sure, mail registry-support for help.
Operation
Before describing your tools, you should carefully identify the distinct functions and the individual operations associated with each one. This is often straighforward, as different functions (modes) typically perform distinct operations:
if a tool has an option between doing one thing or another, then you should annotate the operations as distinct functions
if in contrast a tool always does one or more things, then you should annotate these as distinct operations within a single function
only specify the primary functions and operations, from a typical end-user perspective - tools often do many other things than its central, advertised purpose - you don’t need to describe everything!
Data
data terms must be correctly associated with the operation(s)
only specify the primary inputs and outputs, e.g. a sequence alignment tool would be annotated as reading sequences (input), and writing a sequence alignment (output), but not with gap insertion and extension penalties, or other parameters.
Format
format terms must be correctly associated with an input or output data type
specify the most widely used of the supported data formats - it can be impractical / onerous to be exhaustive!
Other fields
Other sections in the bio.tools editing interface include:
Labels - specify miscellaneous scientific, technical and administrative details, expressed in terms from controlled vocabularies. {learn more}
Links - specify miscellaneous links for the tool. The type of information obtained when resolving the link is specified by Link type. {learn more}
Download - specify links to downloads for your software. {learn more}
Documentation - link to documentation about the software. {learn more}
Publications - specify publications about the software. {learn more}
Credits & Support - specify individuals or organisations that should be credited, or may be contacted about the software. Credits include all type of entities that contributed to the development, maintenance or provision of the resource. {learn more}
Relations - specify details of a relationship this software shares with other software registered in bio.tools. {learn more}